RECIPE: Pan-banging Chocolate Chip Cookies

RECIPE: Pan-banging Chocolate Chip Cookies

First thing’s first: OMG these are A-M-A-Z-I-N-G. They require a bit more attention than a traditional chocolate chip cookie, but they are delicious, soft, and worth the noise and attention. My husband discovered them through Sarah Keiffer on Instagram and insisted I make them. They don’t have a high yield in terms of quantity, but they are giant so it should suffice.

For the full recipe visit The Vanilla Bean Blog. A few tips:

  1. DON’T skip the freezing of the dough ball
  2. Make sure no one requires peace and quiet, i.e. DON’T attempt these during nap time. PLEASE trust me on this- you’ll understand when you start them.
  3. Pay attention and follow the timing recommended in the recipe otherwise you’ll overcook them and/or not get the ripples you want.

RECIPE: Cast Iron Roast Chicken with Leeks

RECIPE: Cast Iron Roast Chicken with Leeks

Because we had such monstrous leeks in our veggie garden I decided to do a second recipe utilizing them- this time with some larger slices.

This picture was obviously taken after we carved it (amateur move I know). This was another Bon Appetit recipe. The issue I had with their recipe was that even though I did the quantity of leeks, they didn’t all fit into the cast iron skillet I had so I had a TON left over, and quite a few of the leeks that were on the top layer burnt and weren’t edible.

INGREDIENTS

  • 1 3½–4-pound whole chicken
  • Kosher salt
  • 3 leeks, white and pale green parts only, halved lengthwise
  • 3 tablespoons olive oil, divided
  • Freshly ground black pepper

RECIPE PREPARATION

  • Pat chicken dry with paper towels and season generously with salt, inside and out. (The recipe calls to tie the legs together with twine, which I didn’t do because I didn’t have twine.) Let sit 1 hour to allow salt to penetrate, or chill, uncovered, up to 1 day ahead. (I let it sit about an 30 minutes- only because I didn’t start the process early enough. That’s tough to do with a 2 year old running around begging for your attention for every little thing.)
  • Place a rack in upper third of oven and set a 12” cast-iron skillet or 3-qt. enameled cast-iron baking dish on rack. Preheat oven to 425°.
  • Meanwhile, toss leeks and 2 Tbsp. oil in a medium bowl to coat; season with salt and pepper.
  • Once oven reaches temperature, pat chicken dry with paper towels and lightly coat with half of the remaining oil. Drizzle remaining oil into hot skillet (this helps keep the chicken from sticking and tearing the skin). Place chicken in the center of skillet and arrange leeks around. Roast until leeks are browned at edges and tender and an instant-read thermometer inserted into the thickest part of breasts registers 155°, 50–60 minutes. Let chicken rest in skillet at least 20 minutes and up to 45 minutes. (My chicken only took 50 minutes and it hit 165.)
  • Transfer chicken to a cutting board and carve. Serve with leeks.

While some my argue what I’m about to say, you can’t just serve chicken for dinner, so I made au gratin potatoes courtesy of Taste of Home. The entire meal probably only cost about $20 and gave us leftovers for another couple of days, and allowed us enough potatoes (if you buy the 5lb bag) to make breakfast potatoes AND still have some leftover – that’s assuming your family size is the same as ours (2 adults and a two year-old). The other awesome thing about the last two days of meals with chicken and leeks was we had enough leftovers between the two that the next couple days were covered with what I like to call “Hodge Podge Dinner”, aka heated up leftovers and you can pick and choose amongst all the dishes.

RECIPE: Rigatoni Pasta with Brussel Sprouts with Leek, Lemon, and Chicken Thigh

RECIPE: Rigatoni Pasta with Brussel Sprouts with Leek, Lemon, and Chicken Thigh

I planted some leeks in our veggie patch several months ago and they had since grown into some pretty massive full plants so I figured it was time to finally attempt to make them into something hopefully delicious. I had never really cooked with leeks before so thanks to Bon Appetit for the help. The original recipe called for freshly shaved parmesan, but my prego brain forgot it- still turned out pretty good though. The whole meal only cost about $25 (for 2.5 people) and lasted a couple days because of the quantity. Pretty good value I’d say.

INGREDIENTS

  • 1 pound brussels sprouts
  • 1 large leek, white and pale-green parts only
  • 4 tablespoons olive oil, divided, plus more for serving
  • Kosher salt, freshly ground pepper
  • 1 lemon, zest removed with a vegetable peeler, cut into very thin strips
  • 4 garlic cloves, finely chopped
  • ½ cup dry white wine (I got a cheap $7 bottle)
  • 12 ounces rigatoni
  • Lemon wedges (for serving)

RECIPE PREPARATION

  • Trim brussels sprouts, then snap off several dark outer leaves from each; set aside. Cut sprouts into quarters (or halve if very small). Starting at root end, cut half of leek into ½”-thick rings, then chop remaining leek. (It feels like a bit of a waste getting rid of so much of the leaves, but I’ve yet to decide how to use them. Plus, if you harvest from your garden, the roots are still active in the ground, so when they grow back I’ll find a recipe by then. I also have 1 more full leek I need to cook.)
  • Heat 2 Tbsp. oil in a large skillet over medium. Add brussels sprout quarters and leek rings; season with salt and pepper and cook undisturbed until deep golden brown, about 3 minutes. Toss and continue to cook, tossing occasionally, until browned all over and tender, about 3 minutes more. Transfer to a medium bowl.
  • Set aside a little lemon zest for serving and add remaining zest along with chopped leek, garlic, and 2 Tbsp. oil to same skillet. Season with salt and pepper and cook, stirring often, until garlic and leek are golden, about 4 minutes. Add wine, bring to a boil, and cook until skillet is almost dry, about 3 minutes.
  • Meanwhile, cook pasta in a large pot of boiling salted water until somewhat al dente, 8–10 minutes; drain, reserving 1 cup pasta cooking liquid. (I made it ‘somewhat’ because I felt they’d be overcooked by the time they were done cooking in the next step.)
  • Add pasta to skillet along with reserved brussels sprout leaves, brussels sprout quarters and leek rings, and ½ cup pasta cooking liquid; toss to combine. Bring to a simmer. Cook, shaking skillet to toss pasta and adding more pasta cooking liquid as needed, until pasta is al dente and sauce is thickened and glossy, about 3 minutes. Season with salt and pepper.
  • (I skipped this step, but it’s in the original recipe) Divide pasta among bowls. Top with more Parmesan and pepper and reserved lemon zest; drizzle with oil. Serve with lemon wedges for squeezing over.

I wanted to add some kind of meat component so I chose chicken thighs. I took a cast iron skillet, melted some butter in it when it was really hot and then stuck 4 chicken thighs so the skin would get nice and crispy. Here was the final outcome.

Something to note if you don’t eat all the leftovers by the next day – the lemon zest that’s used doesn’t end up tasting very good after the 2nd day so I’d recommend making sure it’s either gone by then or you’re willing to toss it.

P.S. Don’t judge for the missing screw in the knife or the fact that the knife and fork are on the wrong sides of the plate.

Yard Doodles

Yard Doodles

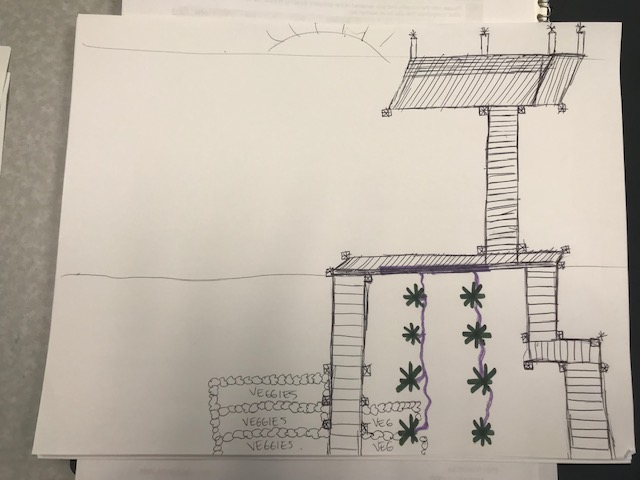
No, that’s not code for Yard Poop. With the thought of being home significantly more and wanting a space that’s both adult and kid friendly, AND enjoyable to be in I’ve been spending more time thinking and sketching out my ideas for the yard. Here’s what I’ve come up with for the backyard (which is far more exciting than the front):

We have a somewhat narrow backyard with a really steep hill, so pretend you can tell these are stairs going up a hill. The green asterix’ are trees and the purple squiggle lines connecting them are hopefully drip lines. I’d like to find a way to collect water on the long narrow deck halfway up and have it feed down into the trees when “opened” so that we don’t have to manually water all of the trees. Then have several veggie boxes along the stairs that are at least 6′ wide x 3′ deep. Then at the very top will be a larger deck with tables and chairs for the view and the sunset. I haven’t decided on the rest of the hill space yet.
OPTION 1
Note: This is NOT to scale.

This first option isn’t too different from Option 2 below. We would refinish the wood planked deck right outside our sliding door, extend the driveway on the far left (which started today, YAY!), add a pergola and an outdoor kitchen, and convert the existing veggie patch into a grassy space with a small kids play structure. I’d also keep some of the smaller, more young-kid friendly vegetables along the edge (most likely a strawberry patch) so that kids can practice taking care of them, picking, etc.

The wood planked deck would have the ability to be closed off with a sliding gate on the left and front side so if we want to keep the kiddos from escaping we can. Plenty of plants and greenery, and then that space can be drowned in sunlight making it really hot in the heat (corny pun intended) of summer so I’d probably get an umbrella that can be put in a corner and bends up and over the seating space if desired. Could also be a heat lamp for cool nights.

On the far right side of the house is where we have all of the wood stored/stacked for the wood stove. Ideally this would be turned into a dog run of sorts so when/if we want to keep Kaiko out of the way or outside but not running around everywhere, he’s got space to pace around an still be comfortable.

OPTION 2

Here’s option 2. It would still have the flagstone in the all white space (which I was too lazy to draw in) and the wood piles would b the same. The parts that changed:

  1. The table on the wood plank would be one with a propane fire that can be lit down the middle. I realized we didn’t have anywhere for a fire pit, and I LOOOOOOVE having small fires to sit around on cool, summer nights, or even clear winter nights. We could also do some marshmellow roasting and smore making. YUM!
  2. Added an above-ground mini coy pond just on the other side of the seating on the wood deck. We’ve talked about this for a while, but could never really decide where to put it. This corner isn’t being used, and it’ll be out of the way, so it seems perfect.
  3. There’s going to be about 2 feet between the edge of the extended driveway and the flagstone patio and I’ve always wanted to do some gabian boxes filled with rocks for some seating and can add some plants like bamboo, or wood planks with sticking creepers to block off what the hubby plans on using the space for.
  4. Last but not least I added some additional space along the edge of the house for rain water collection. The corner in particular gets A LOT of rain so why not collect it and then use it to water plants and the yard, and then maybe at some point get a filtration system to use it for more?

It’s a lot of work, but very exciting. I’m anticipating that the minimum we’ll get this year is the extended driveway and the pergola with dining under it this year. We may get the water storage along the house in anticipation of this winter, and possibly the grass into the current veggie space. The rest will most likely get pushed to next year because we have some interior plans for renovating the master bath and closet (which the hubby hates I’ve been focusing so much on now, haha) as the winter project.

I’ll share some of my inspo on IG stories. So what do you think?!

Growing Pineapples from a Store Bought Pineapple Top

Growing Pineapples from a Store Bought Pineapple Top

Did you know that you can grow your own pineapple plant from the top of a grocery store bought pineapple? I didn’t think to take pictures at the time, since this was months ago, but all you have to do is either twist or cut the crown of the pineapple off so you can see the seeds and then put it into a pot of dirt.

We started 2 pineapple tops months ago and I’ve finally transplanted the slips into their own pots. While my husband just wanted to “let them be” and play it by ear (which seems to be his way of doing most things), I decided to actually do some research in an attempt to get some real pineapples out of the deal. There are a ton of different resources you can reference, but the majority of what I’ve read all say the same thing. It’s possible to start the roots in water, but many see results faster and more successfully by planting the tops in soil.

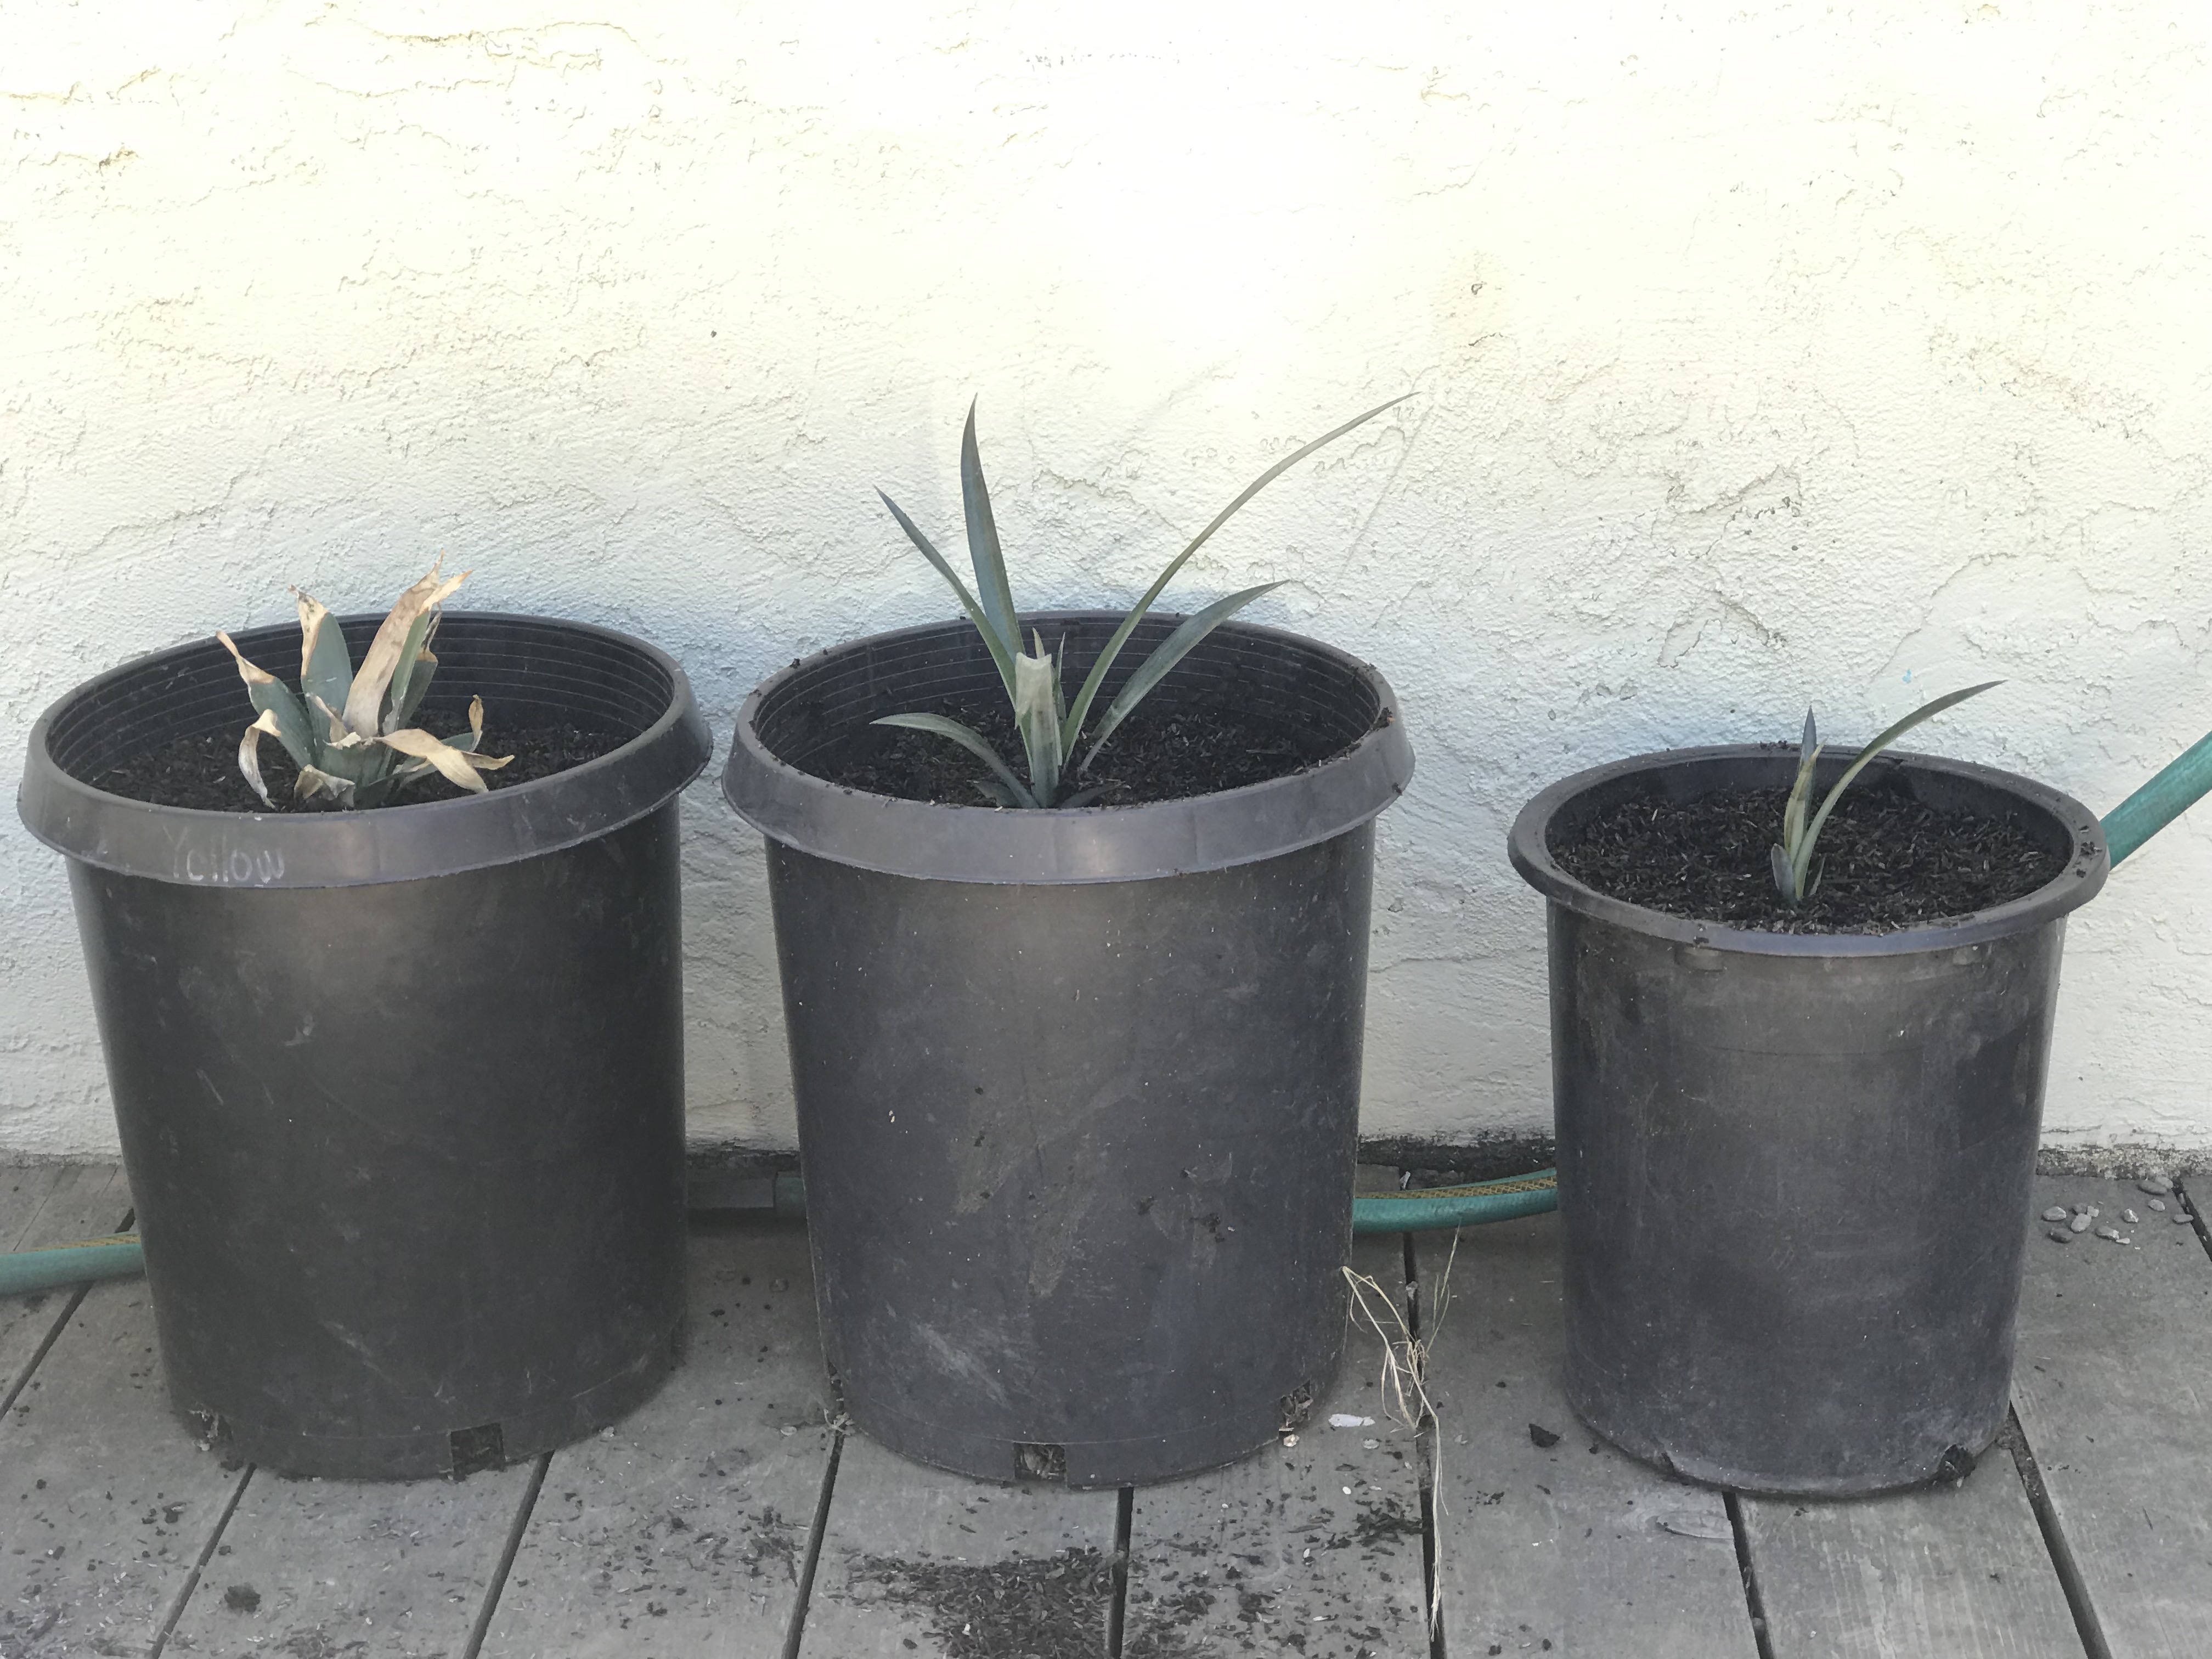
We started with the middle pineapple top that has the brown tipped leaves. The other two younger looking, all green sprouts are what sprouted since the planting. It’s a little hard for me to tell, but I’m pretty sure these are called ground suckers (see below).

The other possible shoots are called slips. Either way, both of these have potential to develop into their own fully grown pineapple plants. If you leave them all attached only one will grown to its full potential and the other will always be somewhat miniature, and this then translates to the pineapple fruit itself. Here is another great resource on Tropical Permaculture that breaks down growing from each type of shoot. If you go through the plants as they grown every few months and break off the new slip or sucker and plant them, you can continue to grown your pineapple garden.

HGTV provided simple a very brief overview here about the different ways you can start growing your own own pineapple plant. As you can imagine, pineapple plants prefer warm, sunny weather so we started them off in a single pot inside to keep it nice and warm while still getting it plenty of sunlight. You should make sure they get 6-8 hours of sunlight a day.

I had originally planned on leaving one of them attached to the parent, but decided to split them up completely to see if I can manage to grown 3 full plants. Since the weather is nice I decided to move them outdoors as well. I also have one more pineapple top that I need to split and plant, but need to get some more dirt and pots. I’m learning as I go, so I’ll definitely keep you update on their progress and what I learn along the way.

Hope this was helpful and now that pineapples are back in the grocery story, go get yourself a pineapple and start trying to grow your own with your littles! Let’s see what you can do!

Growing our Survival Garden

Growing our Survival Garden

Got some new seeds into starter pots this afternoon. These in particular can typically go straight in the ground once you don’t have to worry about frost or the ground freezing, but the weather here has been so iffy, I think it’d be safer to start them here and then move them over once they’ve rooted.

I got the “Survival Garden” starter seed pack through Amazon, and it comes with 32 different varieties of veggies. All non-GMO, pesticide, etc. etc. The same brand has one for herbs and wildflowers as well. It also comes with a handy little booklet that tells you when each group of seeds can be planted, sown, and how far apart they should be once you sow them. Definitely useful for a newbie like me.

We don’t have much space that’s ready for planting, so while I want to go hog wild and plant all the seeds, it’s not realistic this year for the space constraints. If all goes well, this planting will bring our crop up to include what you see in the picture above:

Tomato’sRosemary & Sage (last year)Spinach
Peas (from last year)Blueberry’sTurnips
Kale (last year)Strawberry’s (last year)
Sweet Red Pepper (last year)Raspberry

Here are some of the seeds that are good to have either already started or start putting in the ground now (in CA at least).

We also have some fruit trees, but they aren’t producing fruit yet: apple, fig, lemon, grapefruit, and lime. We actually had to get a new fig tree this year because we didn’t put a cage around the root ball and either a gopher or vole at the whole thing!

Starting a veggie garden is quite the learning curve when you’re not born and raised doing it, but I have found that each year it gets better and better. I’m really hoping these will all product this year helping us eliminate at least the vast majority of the vegetable bill from grocery shopping. We’ve be forking out more $$ for better quality, organic vegetables for the last several months and while it’s something we’re capable of doing, it makes it easy to at least understand why some people on state assistance might buy more processed foods than fresh foods. You get way more and it’s often times much cheaper.

What’s next? Four of my tomato plant seedlings are ready to go in the ground outside, and maybe one or two of the eggplant seedlings, so those will be going in this weekend. More on that through my Instagram @sahmsays so find me and follow if you want some other types of updates!

The Countdown Begins

The Countdown Begins

My husband and I made the final decision yesterday that I won’t be returning to work once my maternity leave starts (end of July) and will be staying home with the kids! Now that we’ve made that decision it’s quite scary. We’ve already notified our son’s daycare, and I have a feeling one reason I woke up at 2am and couldn’t back to sleep is because subconciously I’m trying to plan out telling my boss.

Budgeting is figured out and entered in a budgeting software, and checking accounts will be merged by mid-month (just waiting for all the bills under auto-payment to go through to make sure no error happens). Final steps over the next couple months will be:

  • Calendar of auto-payment schedule
  • Making any additions to the budget that we’ve forgotten
  • Start learning & activity plan for Carlin

Any tips and tricks for someone new to the stay-at-home life?

Taking the Joint-Financial Leap

Taking the Joint-Financial Leap

My husband and I have been married 3 years now, but dated for 7 years before that, and we’re just now taking the leap of joining our bank accounts. For the longest time it seemed like it was better/easier because we each knew when auto-pay bills would be coming out, we could “do what we want” with the extra, and we didn’t want to deal with the hassle of changing the accounts that were tied to each. But, with the direction we are heading as a family, attempting to be more self-sufficient and sustainable as a household through baby steps of homesteading, and wanting me to be able to stay home with the kiddos, we’ve decided it’s finally time.

Aside from this step being considered by many as this step showing that much more trust in your partner, some of the other positives include:

  • Give you a clear financial picture
  • Easy to plan and pay for expenses
  • Budgeting easier to manage

According to an article in US Today, there are some cons as well:

  • Separate checking accounts promote autonomy
  • Separate accounts mean money may can’t be touched by others
  • Separate checking accounts offer less ammunition for money battles

In the grand scheme of things, I trust my husband to not go spending lavishly on his truck projects before all the bills are paid, and he knows I won’t do the same as well. Plus, this will also mean that at the end of every month, since we split all the bills anyway, we won’t have to manually keep track of all the expenses and then calculate what I need to transfer to him, or he to me. As long as we budget correctly and don’t go over, we’re pulling from one bucket that includes both of our paychecks, and we’ll know when and where we need to cut to make the SAHM possible.

The only things we’re not joining are the Savings accounts. This gives a little room to save and spend a little on ourselves. Maybe one day.

How do you feel about joint bank accounts? If the two of you are working, why did you choose for or against it?

The B Word: Budgeting

The B Word: Budgeting

After yet another difficult day at the office with my boss that left me angry instead of sad, stressed, or overwhelmed, I came home determined to get the cleaning done, dinner cooked, and to figure out if we could financially afford for me to stay home once baby girl arrives.

Now, my husband has a good job. It’s steady, it pays well, we don’t have an excessive amount of credit card debt, and while I do enjoy my fair share of shopping it’s not something done daily, or even weekly. What killed my hope for at least the rest of the day after doing the math? It was my damned school loans. School. Loans.

Here’s the math of just the bare minimum financial requirements:

Groceries$400.00
Gas (Only includes hubby)$200.00
Cell$147.00
PGE$100.00
Mortgage + Insurance$3,383.00
Tolls$150.00
A/C & Heater Install$400.00
House CC (Can be paid off by maternity leave)$200.00
US Bank CC (eyeball)$350.00
Water$30.00

Total: $5,600

As you can see, this doesn’t include:

  • Child supplies that may be needed
  • Any monthly funds added to savings or child accounts
  • One other school loan that I plan on having paid off by my leave
  • Any gas for my vehicle
  • Extra, emergency funds

Why am I sharing all of this? One of my main goals of starting this blog is to show and represent the group of women and families that may want to be a stay at home mom but don’t have an excess amount of money to make that easily determined. It’s not just the wealthy that want to this, and it’s even more important for society at large to recognize what has to be given up by families in order to make it happen. So, when the numbers aren’t immediately in your favor what’s the plan?

  • Increased focus while I do have a consistent paycheck to pay off bills
  • Set up a fruit/veggie garden to offset some grocery costs (initial investment and work needed)
  • Save $ as much as I can
  • Continue to work hard at the office

It was a harsh, but real reality – it’s just not possible at the moment, but I haven’t lost hope. Was it an easy financial decision for you to stay home? What was the most difficult thing for you to give up? What was the biggest lifestyle change you had to make?

Adventures of Potty Training

Adventures of Potty Training

I firmly believe this is only something someone that has children (and doesn’t have a full-time child caretaker available 100% of the time) can understand – staying home, taking care of a child, doing the housework, humoring a child, and, in my case, growing a child inside your belly is SO much more exhausting than an office job.

Yesterday was full of everything I just mentioned to you, but it all started with my son waking up with a soaked t-shirt, no pants, and no diaper. Yep- he had taken his pants AND his diaper off and had proceeded to pee in his crib. Why? I have no clue. It seems to be something he’s started doing in the last week and we’re not sure what to do about it besides buckle down on potty training. Any ideas or personal experience with this- please feel free to share.

Anyways, with pee-soaked child in arms I gave him a quick bath, decided that we were going to do no diaper all-day and start the heavy-handed potty training adventure. We’d offer him the potty every 40-45 minutes depending on how much he had been drinking, and hope for the best. Well… it didn’t get off to a great start. 15 minutes later I walk into the kitchen and he’s standing in front of our sliding door in his “I’m pooping” stance- you know what I’m talking about- feet planted, body clenched, and a face full of concentration.

Me: “What are you doing? Do you need to go potty?”

Him: “Nooo”

Me: “Are you sure you don’t need to potty?”

Him: Shakes his head no.

Me: “Okay.”

I step into the garage quickly to check on the laundry (it can’t have been 30 seconds), and when I come back into the kitchen what do I see? A bulge in the back of the training pants. *Insert hand to forehead emoji* So of course, we go change, clean up the poop on his bum, which of course the soft bits drag down his leg as I pull off the training pants and he proceeds to step in it. Great.

Fast forward about 10 minutes later when I’m making breakfast, I look down and there he is with some puddles and wet shorts. 20 minutes into the potty training day and I’ve already cleaned up human excrement and urine 3 times. My husband asks “Are you sure you want to stay home?” I scrunch my face and choose to ignore him, but in my head I’m questioning if I’m capable and patient enough to do it.

To make a short story event longer (but attempting to wrap it up), he peed on the floor one more time in the living room and when he walked back to the bathroom, this of course brought his pee covered foot prints all the way down our hallway. Thank goodness we have wood floors. However, we had no accidents after that and managed to get him to pee in the potty 2 or 3 more times throughout the rest of the day- WINNING!

We’re attempting it again today (which we woke to him with no pants or diaper and covered in pee), so wish us luck. I’ve yet to figure out why he does this at home, but not at daycare. They say he doesn’t have any accidents, and he’s not even 2 yet. Come on kid! Throw your mom and dad a bone!